09 10

Sunday, February 28, 2010

Cards on a Mission - for a son

My brother in law, Charles, is currently serving his third tour of duty with the US Army. Previously he was in Iraq and Fallajah. I don't know where he currently is, as we aren't allowed to. It doesn't really matter where he is as long as he is safe.
Over the past few years, I have been making cards and sending them to our soldiers so that they may send them home to their families. After all there is no card stores on the corner that they can go to! So I thought how great would it be to make cards for someone I know??? No one other then his wife's mom, and his mom know that I am doing this. I want it to be a surprise for all of them.
Charles left his wife at home with their two children, a son who is almost 3, and a 6 year old daughter. I know he misses them, and they are missing him.
This card is for his son. I love this layout, and I am sure if you look through old posts you will see it again. I tweaked it from a card that a fellow PhillyInker, Kristin, had made. All of the elements I used are from stuff I had on hand. I used my Stampin Markers to color the image. (Have i mentioned how much I love them??)

Cards on a Mission

Don't you just love this fairy??? I colored her in with my Stampin Up markers, and did some shading all over her (except her skin, didn't really have a matching color). The sheet of purple patterned paper was actually a sheet that someone from my favorite MB had sent me in a RAK. It worked out perfectly! The little pieces on the sides are actually squares, punched and cut then layered and cut in half.
I started it out as a card for Charles's daughter, but who knows...maybe it would work for his wife too!

Cards on a mission - for a daughter

This is one of the cards that i made for his daughter. The card was from a set that I had bought waaaay back that was prefolded and came with envelopes. I found a cute flower background that I had in my stash and inked it up with StazOn. Since I stamped it a little crooked and missed the edges, I distressed them also. I stamped the cute little girl and colored her in with my Stampin Up markers (Blush Blossom is PERFECT for a skin color!) I then added the three eyelets from my stash, and decided it still needed something. So I added the sentiment on circles and the scallop circle and used some dimensionals to pop it up.

Saturday, February 27, 2010

A Card of Hope

I am a member of the Card Fairies on my favorite MB. People can send missions in to us and our commander, Crystal, sends them out to the fairies. This card is going out to a special woman who will be undergoing surgery early next month to remove her breast, she just found out that she had cancer yesterday. I am hoping that it will help knowing that others are out there thinking of her.
I embossed the ribbon image in silver embossing powder. I colored in the images with my Stampin Up markers and I used the new SU Corner Scallop punch. All of the items I used, including the embossing folder are from items I had on hand.

Monday, February 22, 2010

Wings Of Friendship - three versions


I was home sick today but was able to get something creative accomplished anyway! Of course it took me all day to come up with these three cards! I have some embossing powder that I bought in the early 90's, yes that was what I said 1992 to be exact!!! I am trying to perfect my embossing skills, so I thought I would practice a bit today.
For first card I used the stamp done in Versamark first and then Basic Black Classic ink. Then I embossed it in clear. Then I sponged the cardstock in Bashful blue and inked the edges. The cardstock and patterned paper are all stuff I had on hand. (this is one going to Charles for him to send home to his family- see Cards on a Mission)
The second card I tried something different. I stamped the image in Versmark, and then in a grey StazOn. Then I sponged it in Bashful Blue, and then inked the edges. I embossed the light blue with an embossing folder. I used the new scallop edge punch on the bottom. The sentiment is punched out with the large oval first and then the scallop oval punch.
The last one I switched up the colors. I first inked the image with Versamark and then Basic Black Classic ink. Then I sponged and inked the edges in Soft Suede Classic Ink. The pink I embossed using Stampin Up's Texturz plates. The ribbon and cardstock was all stuff I had on hand. The image and the sentiment on the middle one, is from "Wings of Friendship" the sentiment on the pink and brown one is from Stampin' Up's "whimsical words"
I had fun with these! Only wish I had had a more productive day. :)

Saturday, February 20, 2010

Card Front- Pink and Brown

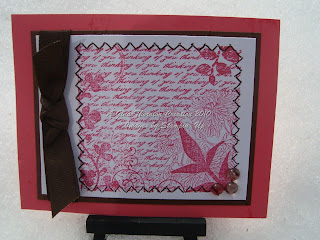
So you may be thinking "hey I have seen this card before" and you probably are right! I get the "Cards" magazine delivered to my home (thanks to my lovely hubby) each month. And there right on the page of the February 2010 issue, it was! I needed a pink and brown card for the swap on my favorite MB, and so this one worked out perfectly!
This is the "Fresh Cuts" stamp set by Stampin Up. It's the first time I used it! The stitching is all faux, I used my trusty Mat Stack from Stampin Up to line up the holes nice and straight. (and at 8+ cards it took a little while!) I then used my marker to draw in the stitching. Then I dyed the little bead things which on my favorite MB we fondly nicknamed "skittles" using my alcohol inks. The ribbon and cardstock are all stuff I had on hand!

Ok you are probably wondering...yes that IS snow in the background! I needed some light to get pictures of my cards and thought to myself "self, why not take advantage of the natural light hitting the snow" So I did. and the pictures came out pretty good. Now I am NOT saying that I want more snow, but at least I got something good out of all that snow we got over the past week and a half!!!!! (and don't worry if you like the snowy background...there are more to come!)

Valentine for my son

As soon as I saw this stamp set I KNEW I needed it! It is the new clear Mount "Fox and Friends" stamp set by Stampin' Up! My son's nickname is Chunky Monkey, or Monkey Butt. LOL I know, I know, it just kind of stuck! :) And he is proud of it! He tells all kinds of strangers that his real name is Chunky Butt and his pretend name is Cameron! He used to be just monkey, because he climbs EVERYWHERE!

Ok so anyway, I knew I had to make him a monkey Valentine! The background is using Stampin Up's new embossing folder. The sentiment I did on the computer and then colored it in with my stampin write markers. The bananas are actually different stickers I had on hand. Each banana is a separate sticker, I just stuck them together on white cardstock to make a bunch and then cut ti out. The hearts are made using two different punches by Stampin Up. The new mini heart punch and the Love you Bunches heart punch (I think that is what is called). then I just gave the hearts and bananas dimension using the dimensionals!


I have more to post so stay tuned, but I am off for now to help my mom order her Stampin Up kit! Yeah!

Valentine for my Daughter

I have had this background stamp FOREVER! I never really knew what to do with it. But when I was sitting down to make my daughter's Valentine card it called to me. I stamped it once, and then pick and chose which candy sayings I wanted stamped them out cut out, and colored them then added glitter! Then used dimensionals to pop out some of the sayings. The great thing about that is that the yellow heart that was where I wanted some dimension, said "Hot Stuff" not good for my Daughter, so I stamped one that said "Hug me" instead! All of the ribbon/cardstock used was stuff i had on hand. I did the border using my Scallop border punch. I think it turned out cute, and better yet...she loved it!!!

Flowers and Flourishes


I made this one for the Card Front swap that I am hosting on my favorite MB. The them is Flowers. I really like how this one turned out, although it would have looked better I think with thicker ribbon, but i used what I had on hand. The flowers are from two different stamp sets by Stampin' Up, Vintage Vogue (clear Mount) and Baroque Motifs. The flourish is an old stamp that I have that was sadly in the back of my drawer. I stamped it twice, going two different directions.

Black and White - Addicted to Cardmaking

These were made for the theme Black and White also for the Addicted to Cardmaking swap on my favorite MB. I used the new Clear mount stamp set "Garden From My heart" by Stampin' Up. I just added a little color to the ribbon using my Summer Sun stampin Write Marker. The sentiment is the new clear mount stamp set "Whimsical Words" (free for SaleABration!!!!) stamped in Whisper White Craft ink. I embossed the background with one of Stampin' Up's texturz templates.

Oh and get this...It smells!!!! Like Daisies! I bought this scented oil a while back and thought that this card would be great with a little flower scent!

Green With Envy - Addicted to Cardmaking

I made this card for the theme Green with Envy for my Addicted to Cardmaking swap on my favorite MB. I have to say though that I TOTALLY CASEd this card from my fabulous Upline Claire Lawrence. I just couldn't come up with my own design, and saw the awesome card she made and had to make one myself!!!
I used the new clear mount Vintage Vogue from Stampin' Up (which by the way Claire ENABLED me into getting!). And the background (on the light green) is the rolling stamp So Swirly (retired). I used the Wide Oval Punch and the Coluzzle cutting system. The border was done with Stampin' Up's new Scallop border. The ribbon, and cardstock are all using stuff I had on hand. The inks I used were Perfect Plum, Pale Plum, Garden Green and Certain Celery (I think).